A Girl's Prep Guide

A guide to survival gear for girls.

  • Prep for Beginners
  • Survival Gear
  • Basic Survival Tips & Tricks
  • Ladies Only!
  • Contact

5 Self Defense Tools Every Woman Should Own

As a woman, you are more likely to be the victim of a random attack than a man. It’s an unfortunate: Women are typically viewed as “weak” and an “easy target”. That is, until we arm ourselves, beat the crap out of our attackers, and change the stigma. Here are five self defense tools and weapons that can help you stay safe — and best of all, they cost less than $20.

5 Self Defense Tools Every Woman Should Own

self defense tools for women

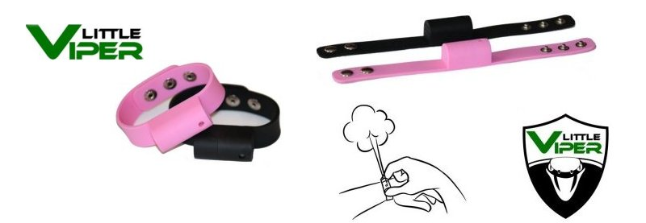
Pepper Spray Bracelet – I bought the Little Viper bracelet over a year ago for self defense protection while running, and I LOVE IT. I’ve always felt vulnerable when working out, even in my neighborhood. How many news stories have we heard over the year of joggers disappearing? I’ve also been attacked by dogs twice in the last five years, so I get extremely jittery whenever a dog barks in my direction.

I’ve worn the pepper spray bracelet way more than I thought I would! It’s a lot smaller than the normal bottle of pepper spray, making it easier to take with you. I generally keep mine in my car. If I’m going to be out late, I’ll tuck it into the front pocket of my jeans. And, when you’re wearing it on your wrist, it looks like a clunkier version of a FitBit.

cartoon-cat-keychain-self-defense-doubles


Cute-But-Deadly Kitty Brass Knuckle Keychain – A cute little accessory and conversation starter that can be deadly should you ever need it. (When you’re walking alone to your car, always keep your keys clenched within your fist to ward off a potential attacker.)

Similarly, there are self defense keys that turn into pocket knives, but I think those would take too long to employ in an emergency situation.

Personal Alarm – If pepper spray and brass knuckles are illegal where you live, pick up a personal alarm. Pressing the button will send loud, 110 siren that can be heard 600 feet away. Simply drawing attention to your attacker will often scare him off.

door-stop-alarm

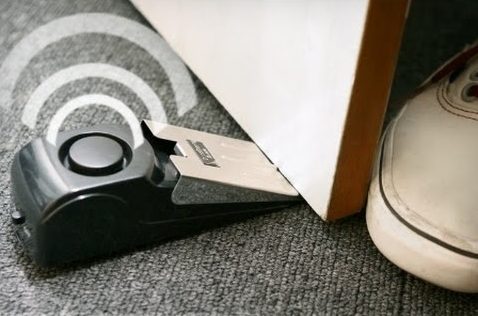
Door Stop/Door Alarm – If you travel and stay in hotel or hostel rooms alone, a door stop with a built in alarm is a simple way to prevent intruders. If someone breaks in, everyone within close range will hear it.

Silver Whistle Necklace – I love this because it’s a functional jewelry piece and a potential lifesaving device. It’s also easy to dress up with a nicer chain. There are a lot of crap ones on the market that don’t actually work, though. It’s best to try out in person or purchase from a reputable jewelry store.

Honorable Mention: StaySafe App – If you’re walking through a nefarious area, you can use the StaySafe App to alert your emergency contacts. You can “check in” when you’ve reached home, or safety. If you don’t check in, the app will send an alert providing your last location.

Honorable Mention: Bra-Stash – Yeah, I know, technically this isn’t a self-defense item, but it will keep your money and credit cards safe! I use my bra-stash whenever I’m traveling abroad, or if I’m out and don’t want to carry my purse.

Another tip: It’s VERY snug if you hook it to the front of your bra, and visible underneath clothing. I usually hook it off to the side, under my arm, or onto the side of my underwear.

Additional Self Defense Tips

Arm Yourself At Home

Every woman living alone (or with a roommate) needs at least a 22-caliber pistol to ward off potential intruders. Keep it within arm’s length of wherever you sleep.

If owning a gun isn’t an option, keep a baseball bat or pepper spray gun near your bed or between your bed and nightstand.

Take a Self Defense Course

I highly, highly recommend taking a martial arts or self defense class. It will give you hands-on experience from close range attacks, plus confidence that can be detected by potential attackers when you walk by.

Self defense courses are not as expensive as you think – Groupon frequently has deals and discounts.

Stay Alert

All of the self defense weapons in the world won’t prevent an attack, but staying alert can help. Being distracted on your cell phone or hesitating to search for your keys makes you a target. Find your keys before exiting. Do a quick survey of the parking lot as you walk out. Check the inside of your car before you get in; get in quickly and immediately lock the door.

Please check state laws.

self defense tools for women

7 Reasons to Switch from Tent to Hammock Camping

why to switch from tent camping to hammock camping

If you’re an avid hiker and camper, carrying all of the gear necessary for a comfortable night’s sleep in a tent can add substantial weight — unless you want to pay top dollar for a lightweight tent and sleeping bag!

Camping in a hammock is versatile, quick, far lighter, and arguably more comfortable. What are the benefits and the drawbacks?


Benefits to Hammock Camping

Lighter weight  – On average, a tent weighs 3-10+lbs, depending on size. By comparison, a hammock weighs less than 2 lbs.

Size – A tent can take up half of your pack or more, while a hammock can take up the palm of your hand!

Versatility – Instead of looking for level ground to set up your tent, you can set up a hammock anywhere you can find two sturdy trees.

More comfortable – Camping in the mountains of the South, it’s been a challenge to find a place that is perfectly level. If I’m on a slant, I’m guaranteed to have a bad night’s sleep. A hammock is appealing to me because I can control the incline by how I tie it off on trees — I’m not at the mercy of wherever I’m trying to make camp.

If you’ve never been comfortable sleeping in a tent…a hammock may be right for you, and eliminates the need to carry an awkward sleeping pad.

Avoid wet ground – Should you find yourself camping in the middle of a heavy rainstorm, it’s challenging to keep your tent on dry ground day after day. With a hammock, you’re above the puddles and mud.

One with nature – You’re even more present in nature in a hammock! Instead of trying to recreate a semblance of home instead of a tent–the very thing you’re getting away from– a hammock provides a different dimension of escape.

Warmer – The ground can be colder than the air, which can make for a difficult night’s sleep in a tent, even with a sleeping pad. In a hammock, even though breezes may be a factor, you’ll avoid having the heat sucked out of you by the ground.


Drawbacks to Hammock Camping

Not ideal for more than one person – Yes, they make two-person hammocks, but getting your “own space” is still a challenge when you’re hanging in the air.

Requires trees/posts – Obviously this isn’t a drawback for 90% of hikers and campers who camp in forests, but if you do a lot of desert camping or hanging out in expansive fields, than a hammock would not work.

No real place to store gear- Hammocks aren’t really made to store your backpack in there with you. Boots, socks, and clothes can be hung on the hammock suspension, but for the backpack itself, you’re left with two choices: place it underneath your hammock, or purchase an additional nylon hammock. (Remember: As always, you should hang your food from a tree far from camp.)

Adapting/Learning curve – The majority of hammock campers recommend doing a “dry run” before embarking on a major trek. Set up the hammock somewhere close for one night — that way, you’ll get practice with the set up, as well as adapting to sleeping in a hammock.


Choosing a Hammock and Additional Gear

There’s a few questions to ask yourself before selecting a hammock:

  • How long are your camping trips?
  • What type of weather will you use the hammock in?

Depending on the type of climate, the time of year and length of your camping trips, you may also want to invest in a hammock with a mosquito net and a fly to hold off rain (or a tarp at the very least).

There is at least one after-market purchase you should invest in: Quality tree straps.  Amazon sells a few sturdy tree strap options from $15-$29.99. (There’s also a $6 version, but just read the reviews — the quality and durability is a crapshoot.)


Using a Hammock in a SHTF Scenario

I like the idea of hammock camping because it’s a smaller system and far more portable than a tent. You can also set up in less conspicuous places, and with hammock colors coming in dark greens and camouflage, you won’t stick out.


Have you used a hammock for camping? Did you love it or hate it?

photo by:

The Ultimate Get Home Bag Checklist

The Ultimate Get Home Bag Checklist

What is a “Get Home Bag”?

A Get Home Bag is a bag with contents you would need to survive in order to make it home from work, school, or any place that isn’t home.

A “Get Home Bag” also assumes that public transportation, convenience stores, and major roadways will be chaotic and overrun. Depending on what time of catastrophe occurs, ATMs, internet and cell phones may not be working.

When SHTF or disaster strikes, you will want to get home as quickly as possible and, if you generally stay within 10 miles of home, you will not need a lot of supplies to make it back. A Get Home Bag should have the bare minimum.

Your “Get Home” bag should be 100% packed and ready to go in the event of SHTF. The biggest advantage you can have when catastrophe strikes is being one of the first to realize what’s happening.

Choosing a Get Home Bag

I’ve said it here before — a backpack that looks tactical is making yourself a target. Think about your environment and the type of pack that would look most normal under ordinary circumstances.

Bike messenger bags, canvas backpacks, laptop backpacks, or even a large fanny packs would serve the purpose, depending on your needs and how far from home you are on a daily basis.

The Get Home Bag Checklist

After refining my strategy for the past three years and doing continuous research, this is the list of items I keep in my Get Home Bag (with the exception of a foldable bike — that is still on my wish list.)

Alternate Transportation

This is optional, but could make a huge difference depending on your situation. If a solar flare or EMP hits and cars are useless and you’re in the middle of a city, having the ability to get out quickly will be to your advantage. A great solution is a fold-up bicycle that can fit nicely into the trunk of your car (I recommend getting a sturdy, fold-up mountain bike with 18-21 speeds so that the bike could also be used for bug out purposes).

Communication

  • Hand-Crank Radio. Having a hand-crank radio will pick up weather and government alerts. The model that I have also comes with a flashlight and USB charger.
  • Two-Way Radio. If you and your spouse work within close proximity, it may be a good idea to have two-way radios on hand in the event of cell tower loss. This is also practical for unexpected power outages.
  • Automatic Watch. This is an optional tool, but could be useful if you have rendezvous plans with someone or want to keep track of how much time has elapsed since whatever incident/calamity occurred.

Food & Water

You don’t need much food for a get-home bag, but having high protein snacks on hand to keep your energy levels up is important.

Here are some snack suggestions:

  • Almonds
  • Beef jerky
  • Granola and/or granola bars
  • Tuna fish
  • Trail mix

For water, I have a Camelbak, Lifestraw, and two pre-packaged pouches of water with me.

Health

  • Feminine Products. A menstrual cup and a pair of “period underwear” will give peace of mind should calamity strike at an inopportune time of the month. (Compostable biowipes will clean up any messes.)
  • First Aid Kit. A small and lightweight first aid kit is a practical investment for handling any non-serious incidents you may face while trying to get home. (And it’s a good idea to keep a first aid kit in the car, anyway.)
  • Medicines. An extra day’s worth of doses for any medication that you take. (This could be an inhaler if you’re asthmatic, or insulin if you’re diabetic.) Be mindful to rotate this out regularly.
  • Nuclear Fallout Preparation. Do you live or work near a nuclear power plant? In the event of fallout, Potassium Iodide — “KI” — will block your thyroid’s absorption of radioactive iodine. (Read the CDC’s recommendations about taking KI here).

Navigation

  • Compass. A compass is a must-have for reading your map, regardless of how familiar you are with your area. You may need to take a back road, and when time is key, you don’t want to get lost heading in the wrong direction.
  • Map. A detailed map of your state and city are vital, and planning a route around major arteries is a good idea. Also pinpoint areas of interest/concern in your area should the grid collapse, such as the aforementioned nuclear power plant along with regions that would likely be affected by fallout.

Shelter and Warmth

  • Extra clothes, socks.
  • Firestarters or Fuel Pouches. Have you ever tried to start a fire with nothing but the sticks that Mother Nature provides? It is tough and time-consuming. Firestarters or fuel pouches are very affordable will give you an extra advantage, especially if it’s damp.
  • Lightweight rain jacket and/or poncho. Being wet can lead to hypothermia, even in temperatures above freezing.
  • Lighters. Lighters are obvious, cheap, and quick fire-sources, and way more reliable than flint and steel.
  • Mylar blanket. For an emergency source of warmth if you’re stranded in a chilly spot.
  • Tarp. This will allow you to quickly string up a temporary shelter to get out of the elements.
  • Waterproof shoes – Comfortable shoes that protect your feet against the elements will go a LONG way. Research different kinds of hiking boots — and by this I mean go to the store and try them on. (Tip: Once you’ve made your choice, see if 6pm.com carries your brand/size for a deep discount.)

Self Defense

  • Pepper Spray.  Being able to defend yourself as society is collapsing is key. Pepper spray bracelets are a good solution as they’ll be within reach while keeping your hands free.
  • Sharp Keychain (check your state laws first!). Keys held in a closed fist will do the job, but for a sharper edge, I love the Cat Self Defense Keychain as a backup in close-combat situations.

Tools

  • Boy Scout Handbook. There’s a lot of good and practical advice for survival in these pages.  It may be too bulky to carry with you, but should be read in advance.
  • Cash in small denominations. ATMs will likely be down. For potential bribes or unforseen purposes, plan on having $100 on hand.
  • Dry Bags. A must for keeping food, fire-starting materials, and a change of clothes dry. (Amazon sells a set of 3 for $11.99.)
  • Hatchet (check state laws). If you’ll be needing to camp overnight and build a fire, you will need a small hatchet or some way to chop up timber. (This is only a good idea if you’re in a wooded area, not the middle of Central Park.)
  • Machete (check state laws). This is only of use if you live in an area where you may need to traverse through some thick brush or weeds.
  • Multitool. I use my multitool on a regular basis for all kinds of things — the knife, scissors, wire cutters, and screwdriver are very practical. My go-to is the Leatherman Blast (discontinued), or the Leatherman Wingman.
  • Paracord. There are a thousand uses for paracord and every survival website on the planet cites paracord as a top resource! Use it to string up your tarp, hang food bags to keep away from bears, attach tools to your bag, etc.


To my fellow survivalists, what would you add?


Why You Shouldn’t Buy a Bug Out Brand Backpack

When selecting a bug out backpack — particularly if you’re in the market for a “bug out brand” backpack — you’ll be shown recommendations for a range of tactical backpacks manufactured by Sandpiper.

I’ll be honest: I used to have a Sandpiper pack. It worked fabulously for carrying all of the little trinkets that I could fasten using MOLLE pouches.

However, after doing some more reading online and considering overhauling my bug out bag system, I decided: a camping backpack would be much, much better than a bugout brand backpack.

Why You Shouldn’t Buy a Bug Out Brand Backpack

It’s a big, HUGE tell that you know what’s going on. If you should ever have to put your bug out plans into practice, there isn’t a faster way to attract attention by having a tactical-looking bag strapped onto your back. You become a target — simply because you’re advertising that you may have military experience, or that you’re a survivalist with a plan (which is more than the majority of the population can say).

Bug out brand backpacks are not all that comfortable for hiking. My Sandpiper just didn’t retain its shape that well once I loaded it up, and it strained my back after awhile. The lumps cut into my back unless I packed it just right; the waist straps just didn’t cut it for weight distribution, especially when hiking several miles. I much, much preferred using my North Face camping backpack.

Why You Should Buy a Camping Backpack Instead of a Bug Out Brand Backpack

It’s easier to strap tents/sleeping bags to a camping backpack. My bug out brand backpack didn’t have the system in place for strapping a tent and/or sleeping bag to the bottom, which is key for my bug out strategy. A camping backpack, on the other hand, is designed to haul everything you may need, including a tent AND sleeping bag.

Better support and framing. This is just in my experience, but the breathability of camping and hiking backpacks really adds to comfort when you’re trekking several miles. Due to the better frames of hiking packs, they also retain their shape better.

If SHTF, camping backpacks don’t raise curiosity. Even now, I don’t notice camping backpacks as much as I notice tactical backpacks. I often wonder why people carry tactical packs out in public places, for example — maybe they just like the design, maybe they’re former marine, or maybe they, too, are survivalists.

Camping Backpack Brands to Consider for a Bugout Bag

North Face – A classic in the world of camping backpacks, they’re  structurally sound and designed for multi-day hikes. I used to carry a variation of the Terra 55 and loved it.

Osprey – Cream of the crop. You won’t find a more durable bag, or a bag that is capable of storing more stuff while still distributing the weight evenly. (My current bugout backpack is an Osprey Farpoint.)
   

Kelty – I’ve never used one, but Kelty has been making packs for years and fall at the more affordable end of the hiking backpack spectrum.


Note: Ordinarily, I would only include packs designed for a woman’s build as this website is called girls prep guide — however, packs for women tend to be bright colors not found in nature, so I’ve also included men’s/unisex packs that tend to be more subtle in color.

Do you have a “bug out brand” backpack? Do you disagree? Why or why not?

Survival Gear Every Woman Should Keep In Their Purse

survival gear every woman needs in their purse

I work downtown, and I sometimes wonder what would happen if all goes to heck while I’m at work. Can I get home? Are cars able to start? If not, can I get to my bug out bag in my car? 

And then I think… I really should have a few supplies in my purse.

Some of this will depend on your purse size and how close to your car you are while you’re at work. If you’re nowhere near your car, I’d opt for a larger purse than I normally would — something with multiple sections, that way, you can keep all of your survival gear together.

The Purpose of Having Survival Gear in Your Purse

A purse survival kit is the bare minimum for maintaining sanity for 1-2 days. You are not meant to survive indefinitely on these items. These items are merely meant to help you get from wherever you’re stranded to your safe place, taking into consideration that you may need clean drinking water, food, and a makeshift shelter.

Waterproof/Stormproof matches – Matches are the quickest, most efficient way to start a fire, a fire that you may need for cooking or warmth. For long-term survival, you may want to learn how to use a flint and steel, or a magnesium fire starter — but for the purpose of getting from A to B, matches are quick and easy.

Pencil sharpener – A pencil sharpener is a great idea to create tinder: sharpen twigs to create shavings for easy fire-starting. (You can also use the sharpener for your eye pencil.)

Pocket Mirror – Use the compact from your makeup, OR pack a separate signal mirror. This can be used for starting a fire or signaling across long distances.

Local Map & Compass – Have a map of your area to have on hand, and study it to find alternate routes to your safe place. Obviously, having a compass is key to make sure you’re headed in the right direction. (I love the idea of the Survival Bracelet, which comes with a compass, is woven out of paracord, and comes with several other tools that could be used in a pinch.)

Mace – Hopefully you won’t need to use this… but as a woman potentially on her own, you’ll be glad you have it. For me, it also brings peace of mind when walking alone on dark evenings.

Water filtration straw (with pouch)  – For cleaning running water you may find from creeks or streams. (Drinking stagnant water is a last resort.)

(3) high protein bars of your choice – I opt for these over the 3600 calorie bricks that weigh far too much for a purse. (Remember to swap out these bars every five months since they don’t keep as long as the vacuum-sealed type.) I almost always have raw almonds and a pouch of tuna with me — it functions as a a healthy back-up lunch option if nothing else.

Miniature leatherman – There are multiple uses for a small leatherman. Bringing a miniature pocket knife to work depends on where you work — obviously, a school or daycare is a bad idea — and probably against policy.

Poncho – To keep dry in case of rain.

Emergency Mylar Tent – If your home/safe place is more than a few hours’ walk from your office, a mylar tent can help keep basic elements off of you and reflect heat (should you need to traverse fields and forests. Not really recommended for city use).

Space Blanket (x2) – Again, this is for extreme conditions when you may need to keep warm.

Socks – A pair of dry socks can make all of the difference for morale.

Collapsible/Rollup shoes–  This is a larger item that can only fit in larger purses, but if you’re stuck in high heels and have no place to keep sneakers at your office, these are better than going barefoot.

Optional:

4-6 pouches of drinking water– If you live in an arid part of the country that doesn’t see a lot of rainfall, it’s a very good idea to keep pouches of water on hand. I store mine in the car.

If Assembling the Purse Survival Kit for Others…

If you’re planning on assembling a “purse survival kit” for your wives, mom, or sister who may not be 100% on board with prepping, remember: presentation is everything. Consider packing it up neatly in something like a medium-sized makeup organizer.


What would you add to the purse survival kit?


Bug Out Bag Gear Must-Haves: Microfiber Towel

Packing a bug out bag is tough, as if you plan to travel long distances, you’ll want to keep your bag as light as possible (consider adding panniers to your bike for additional food and water storage).

But what is one must-have that has several uses, and even provides a little bit of creature comfort?

The Microfiber Towel.

I use a microfiber towel when camping or backpacking abroad, and it’s been a life-saver. Packing a towel sounds cumbersome, but hear me out — these towels are a fraction of the weight of your standard bath towels, and they have several uses in a survival scenario.

Reasons to Add a Microfiber Towel to Your Bug Out Bag

  • Drying off after bathing
  • Serve as an extra blanket on cold nights
  • Head covering in direct sunlight / cold compress if soaked in cold water
  • Wrap around clothes for a makeshift pillow
  • Sun covering if have to build a makeshift shelter
  • Could serve as an absorbent rainwater catch in drastic scenarios (ring it out afterwards and purify the water)
  • Packs down 5x smaller than a regular towel
  • Air dries SUPER quickly (can even air dry by draping over your backpack while hiding)
  • Fraction of the weight of a regular bath towel
  • It’s a little piece of comfort of home life before SHTF, which may help your morale.

Where to Buy a Microfiber Towel

There are several different options for microfiber towels available at various camping stores, but as always, Amazon seems to come out on top with the best pricing — a quality microfiber towel on Amazon costs around $20-$30.

How many microfiber towels do you need? These are questions you’ll best know the answer to: How many people are in your family? Will you be bugging out in a warm climate? You may be able to get away with 2-3. If you’ll be bugging out anywhere that experiences cold weather and freeze warnings, one towel per person can help as an additional light layer.


Is a microfiber towel on your bug out bag packing list?


Survival Gear Review: Why You Should Add the Diva Cup to Your Bug Out Bag


To my fellow lady preppers and survivalists, have you heard of the Diva Cup?

If you haven’t, I’m telling you… it’s a must-add to your survival kit. Surviving the end of the world is one thing… surviving the end of the world while on your period is something else.

Add the Diva Cup to Your Bug Out Bag


What Is the Diva Cup?

The Diva Cup is a reusable menstrual cup, made of high quality silicone to guarantee the best comfort and fit. Instead of swapping out pads or tampons every few hours, a menstrual cup offers protection for 10-12 hours – and since it sits inside the vaginal canal, collecting your flow rather than absorbing, it also boasts leak-free protection.


Why the Diva Cup is Ideal for Survivalists

Goodbye Tampons- Isn’t it nerve-wracking to think about how many tampons you may need if society collapsed? And surely you don’t want to return to the Biblical days of just sitting on a hole in the ground! Instead of chugging along 40 tampons in your bug-out bag, you can replace it with just one small and reusable Diva Cup.

Size- At about 3 inches long, the Diva Cup comes with a nice little discreet pocket for easy storage. Since it’s made of flexible silicone, it can easily be crammed into your bugout bag.

Cost- A box of tampons is around $5. The Diva Cup is $25-29 on Amazon. After 5-6 months of use, it will have paid for itself.


Using the Diva Cup

Without getting too awkward or personal here, I will admit, it does take some getting used to. You will become more familiar with your body. At first, placement can get a little strange and uncomfortable, and although the Diva Cup comes with a recommendation for easiest insertion, but there are alternative methods available on their website.


Which Diva Cup is For You?

There are two different kinds/sizes of Diva Cups for girls and ladies at different stages in their lives. (You may also want to pick up the DivaWash as well — as you can imagine, these need to be more than just rinsed after each cycle!)

1. Pre-childbirth (View on Amazon)

2. Post-childbirth (View on Amazon)

Using Reusable Pantyliners with the Diva Cup

The Diva Cup will catch the majority of flow, but leaks can happen, especially in the beginning as you’re getting used to using the cup. Reusable pantyliners — or even better, period underwear — can do the trick and provide long-term sustainability.


Note: I was not perked to write this review – I just love this product!

My Bug Out Bag Packing List

I’ve written about how to assemble a basic survival kit, but if you’re beyond that and looking for a bug out bag list, here’s one to get you started! This is my complete bug out bag packing list, whittled down and adjusted after hiking and camping a couple of times this past fall.

Note: This is the bug out bag list that works for me. You may need to pack different items. A good test is to go camping for yourself, and see what you need.


Bug Out Bag List: General

Camping Backpack (I don’t carry a “Bug Out” Backpack)

Camelbak Hydration Reservoir (fits in backpack)

Bungee cords


Bug Out Bag List: Shelter

Sleeping pad (strapped outside – for extra warmth)

Lightweight Pup Tent (strapped outside)

Down Sleeping Bag

Silk sleeping bag liner (for extra warmth)

Tarp


Bug Out Bag List: Kitchenware

Mess Kit

2 Sporks

Foldable Sterno Stove

2 Sterno fuel canisters


Food (enough for 1 week)

3-day calorie bar

2 packs of red beans & rice (only use if water is in abundance..it makes me thirsty)

1 lb trail mix

1 pack of beef jerky

2 single servings of peanut butter

2 packs of 5 minute rice (minimal seasonings = minimal sodium)

1 can of tuna fish

Instant Vanilla Coffee (curse my caffeine addiction!)


Bug Out Bag List: Tools

Folding Pocket Shovel (Walmart sells a cheap one for $5)

Leatherman Sidekick Multitool

Paracord

Pocket Chain Saw

Firestarters

Flashlight and Headlamp

Inflatable Solar-Powered Lantern

Compass / Whistle

Emergency Radio w/ Solar-Powered Flashlight


Bug Out Bag List: Clothing

Poncho

1 thermal long sleeve undershirt

1 thin turtleneck

Leggings

2 pairs underwear

3 pairs of socks (including 1 wool)

Gloves


Bug Out Bag List: Hygiene

1 toothbrush, toothpaste

1 pack pocket-sized tissues

Diva Cup

Homemade facewash (witch hazel + pure lavender)

Cotton pads (for using facewash – can also double as tinder)


New Items to my Bug Out Bag List

After going camping, started packing a foldable shovel, packable chainsaw, and sleeping pad. The shovel comes in handy for digging a little spot in the ground where your hips and shoulders will go as you sleep. The pocket chainsaw was good on trees with a diameter of 5″ or less – but a little awkward to use, since you have to keep the log from rotating by putting it between your legs.

The sleeping pad seems like an excessive, “creature comfort” type item, until you spend the whole night freezing because the ground is so cold, even if you’re wearing multiple layers!

Still to Add

This is a pretty good self-sufficient list, in my experience camping. The only thing I’d like to add is a larger pot/kettle to boil a larger quantity of water.

I just read an article about adding an old school pencil sharpener to your bug out kit – for when you’re out of tinder or firestarters, just sharpen some sticks and use the shavings. Genius.

And….I’m still undecided on the Sterno. It’s convenient and fantastic – but you do have to haul around fuel for it, which adds considerable weight pretty quickly. Throwing a grill on the fire is just as easy.


Room for Improvement

I’m still seeking foods that aren’t so sodium-heavy, since I might not always be near a rushing stream. However, salt is a great natural preservative, allowing food to keep longer.


What do you think of my bug out bag packing list? What survival gear would you add?


Assembling a Basic Survival Kit

As girls, we’re multi-taskers, we’re organizers, and we’re planners. We’re also pretty damn good at being prepared.

It’s difficult to say what the situation could be that you’d find yourself in: Perhaps stranded in a snowstorm on the interstate, lose electricity goes out due to severe weather, or worse, lose electricity for who knows how long thanks to an EMP. Items you’d always taken for granted, such as  food, water, and warmth – are no longer at your disposal. How will you and your family survive?

Depending on your expertise and individual needs, it’s up to you what to put in your kit – and a basic survival kit is a great place to start.

Here’s a list of some of the first items I got for what could be dubbed as my very basic “survival” kit, or basic bugout bag:

  • Camelbak Hydration Pack (fits in backpack in its own sleeve)
  • Down Sleeping Bag (for ladies)
  • Leatherman pocket knife (SUPER convenient)
  • Lots of protein bars
  • 3-day calorie bar
  • Red beans and rice
  • Mess Kit
  • First Aid Kit (assembled my own after discovering pre-made kits are lame)
  • Matches & Firestarters
  • Poncho
  • Moon Cup/Diva Cup
  • Lightweight Tent & Tarp
  • Paracord

I keep these in a backpack in my car, along with boots, snowpants, jacket, knit hat, and gloves. Going camping a couple of times has helped me refine the list, including restructuring my first aid kit. (Be sure to read  rant/review about the crummy first aid kit I bought at Wal-Mart for $14.)

By the way – if you’re unsure of what you’d actually need in a survival scenario, take a friend and go camping for a weekend. It’s the best way to realize how little you actually need – and it will also help you realize what skills you should refine.

What items do you have in your basic survival kit?


[author] [author_image timthumb=’on’]https://www.girlsprepguide.com/wp-content/uploads/2013/01/IMG_2911.jpg[/author_image] [author_info]SG recently joined the world of preppers and survivalists, and  realized there’s very little information aimed specifically at ladies. A Girl’s Prep Guide was born to address women’s issues, and as a place to get honest reviews about gear. [/author_info] [/author]


Survival Gear Review: Wal-Mart’s Outdoor First Aid Kit

Seeking out additional affordable items for my survival kit, I splurged on a $15 “Outdoor” First Aid Kit at Wal-Mart. With an advertised 123 items, surely it’d have anything I could possibly need at moment’s notice.

There were even people doing outdoorsy things on the exterior packaging. Perfect!

I threw it in the back of my car, immediately feeling more at ease. If I suddenly needed to bandage myself or someone else, I had all the tools I needed – ESPECIALLY if we were somewhere in the great outdoors. Right?


 When Put to the Test…

There we were, camping and collecting firewood. We were having a good time, when suddenly, one of the members of our party nicked himself in the leg with a hatchet. A little freaked, I ran to my tent and grabbed the Outdoor First Aid Kit.

Upon examining the cut, it seemed a little too wide for simple bandages. A few butterfly bandages, sterile pads, gauze, and tape would do the trick. I flung open my new first aid kit, to find there were bandaids, oh yes. Lots and lots of little bandaids, probably about 70. There were also three single-size servings of triple antibiotic ointment to go along with those 70 bandages. But there must be more, I thought, examining every pocket and crevice.

There was a cold compress – two, in fact.

There were sterile examination gloves.

There were crummy plastic tweezers.

There were even butterfly bandages.

But there was no freaking gauze or decent sterile pads… and the tape roll barely had enough tape to wrap around a finger.

Fortunately, someone else in our group had a more adequate set of first aid equipment, and we were able to bandage the wound – no thanks to the Piece-O-Crap First Aid Kit I got at Wal-Mart.

My advice? Look up a comprehensive first aid list online and buy the items yourself at Dollar General. That way, you’ll know what you have, and you’ll know you have what you actually need.


The GPG Verdict: Thumbs Down

Note:  Be careful, they now appear to be selling a “250 piece set” with eerily similar packaging. 

A Girl's Prep Guide provides a resource for the needs of women who want to be prepared for any scenario, specifically, camping and survival. Product links may contain affiliate links, at no additional cost to you.

Ebates Coupons and Cash Back

Recent Posts

  • Hardy and Tasty Survival Chili Recipe
  • Gear Review: Little Viper Pepper Spray Bracelet
  • 5 Self Defense Tools Every Woman Should Own
  • Prepper Food: Stocking Up at a LDS Home Storage Center
  • Bug Out Survival Food: Bars, MREs, or Freeze Dried?
Follow Lara's board Survival Gear for Ladies on Pinterest.

Follow

  • 
  • 

Top Posts

  • Survival Gear Every Woman Should Keep In Their Purse

Pretty Chic Theme By: Pretty Darn Cute Design